Blog

  • Combining Qt and OpenCV

    Before writing a minimal sample for some technology, I usually take the time to see if there already exist one on the net. For a simple example that illustrates how to combine Qt and OpenCV I found the following post. Just download the project at the end of that post.

    This post explains compiling the sample code using Qt Creator.

    Mac OS/X

    In previous posts, I’ve mentioned how to install Qt and OpenCV on the OS/X by manually downloading and building them, however, the shortest route to get the above sample to compile and run on the Mac is to install Qt and OpenCV as follows:

    brew install opencv
    brew install qt

    if you get errors during one of these installations, look at the message – its usually solvable by adding write permissions to the folder mentioned in the message. Note that its best that you uninstall any previous versions of Qt and OpenCV prior to doing that.

    The ShowImage sample also requires pkg-config which is not installed by default. For that simply

    brew install pkg-config

    Again the above works great and saves you manually installing all the dependencies of pkg-config.

    At this point, launch Qt Creator, and open the project ShowImage.pro
    When you build the project you could get the following error during the build:

    sh: pkg-config: command not found

    At first I thought it was strange since invoking pkg-config from the command line worked, so it was definitely in the search path (which was confirmed by invoking which pkg-config from the command line). After some searching I realized that Qt Creator does not use the shell path to look for pkg-config. In order to let Qt Creator know where to find pkg-config you should explicitly add the path to the build environment by clicking the Projects icon on the left and adding the path the pkg-config in the Build Environment details (see below).
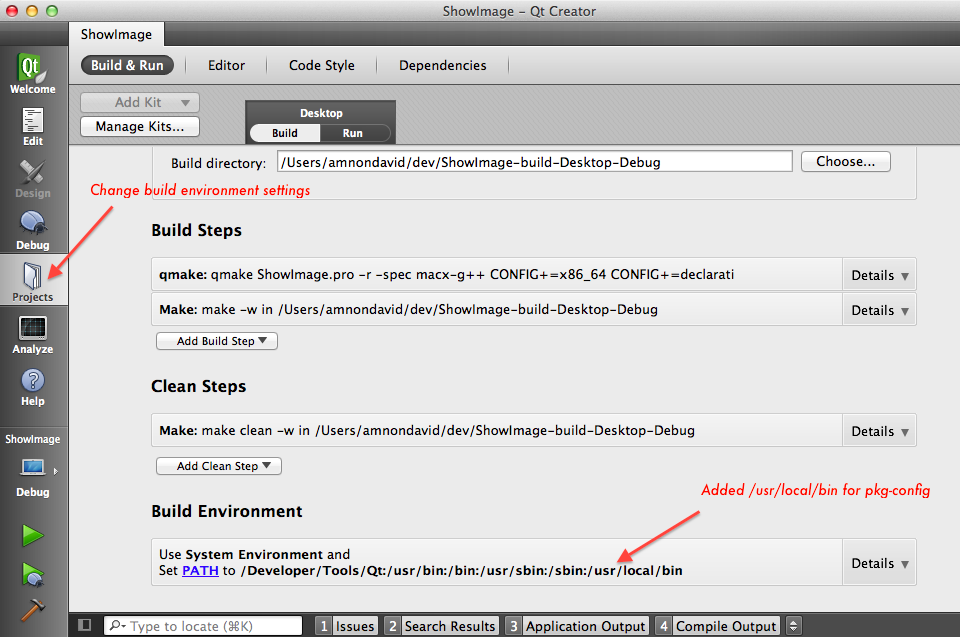
    Qt Creator Build Envoronment
    Qt Creator Build Environment

    On Ubuntu

    Loading and compiling the ShowImage.pro in Ubuntu had it’s own problems. Compilation failed with an error of

    bits/predefs.h: No such file or directory

    which was somewhere along the include tree required by Qt4.

    I found the answer to this here and a sudo apt-get install gcc-multilib solved that compilation issue. This seemed strange since my ubuntu is a 32-bit installation and this solution was to install 32-bit headers on a 64-bit system – but for the time being I let that slide. However this left me with this new hurdle:

    moc_mainwindow.cpp:14:2: error: #error "This file was generated using the moc from 4.7.3. It"
    moc_mainwindow.cpp:15:2: error: #error "cannot be used with the include files from this version of Qt."
    moc_mainwindow.cpp:16:2: error: #error "(The moc has changed too much.)"

    A solution for this was explained by Anjum Kaiser here and indeed a

    make distclean
    qmake
    make

    from the command line resulted in an executable that worked.

    However I wanted to make sure I can build a working executable from Qt Creator and attempting to build the project from Qt Creator after make distclean from the command line, returned the following error:

    libopencv_calib3d.so: could not read symbols: File in wrong format

    This got me thinking about the 32-bit/64-bit issue and it dawned on my that Qt Creator might not be building the project the same way it is built from the command line. A quick look in the Qt Creator projects configuration showed that indeed g++64 was specified instead of g++32. Fixing this (below) enabled smooth compilation.
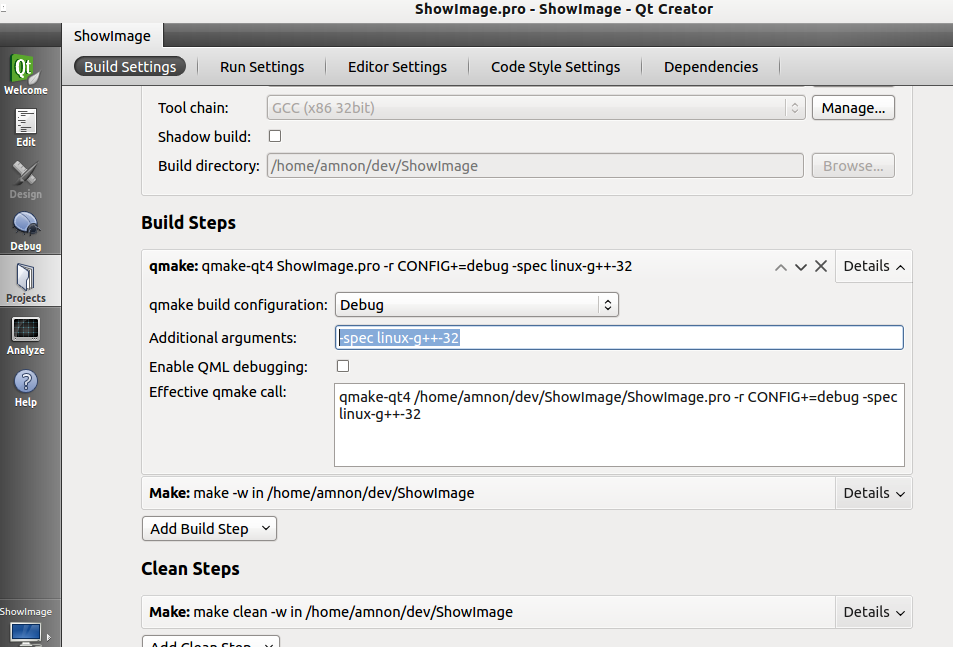
    Qt Config configure g++32 on Ubuntu
    Qt Config configure g++32 on Ubuntu

    However – when attempting to run the app – yet another surprise:

    error while loading shared libraries: libopencv_highgui.so.2.4: 
    cannot open shared object file: No such file or directory

    a locate libopencv_highgui.so (remember to sudo updatedb first) showed that the library exists at /usr/lib but the loader doesn’t know about it. The next step was then sudo vi /etc/ld.so.conf, adding /usr/lib to the end of the file and finally sudo ldconfig.

    This, finally, did the trick and the app could be successfully compiled and launched from within Qt Creator on Ubuntu 12.04

  • Installing OpenCV

    OpenCV is considered by many to be the best open source computer vision library. It has versions for Windows, Linux, Mac, iOS and Android. As Windows installation is usually easier, I’ll focus on Linux/Mac.

    OpenCV uses cmake (Cross Platform Make) to configure and build the library. You can download cmake for the relevant platforms here (unless you’re interested in compiling it, I suggest downloading the binary distribution).

    Once cmake is installed (make sure its in the path by running cmake from the command line), download the OpenCV sources for Linux/Mac (a tar’ed bz2 archive) and extract them to a directory. Next, cd to that directory and issue:

    cmake .
    make
    sudo make install

    if you need to uninstall for any reason just issue sudo make uninstall from the same directory.

    On OS/X a simpler (and possibly better option) is brew install opencv (brew), which will automate all the above.

  • Qt learning curve journal, part II

    Being able to make and run the Qt samples is cool, but to really dig into learning a framework I prefer to have the ability to easily navigate to declarations, easily debug, auto completion, in short – an IDE.

    There are two options that I recommend. The first is QtCreator – the IDE that comes with Qt. Although the site claims that “Qt Creator IDE can also be downloaded as a standalone application, although we recommend to get it via the SDK above if you need a complete Qt development environment”, I haven’t managed to find in in the SDK bundle. However you can download binary and source versions from here.

    The second option is NetBeans which the cross platform IDE I’ve liked the most since I first tried it in back in 2003. I checked if it has built-in support for Qt. It does.

    For developing Qt applications you need only download the smaller sized NetBeans for C++ from this page. You can easily create, compile and run a Qt project from NetBeans by following the explanation on this page.

    Having done this, you have access to all the NetBeans goodies when developing your Qt application.

    I’m sure Qt will work well with eclipse and other frameworks, though I haven’t checked and therefore can’t comment on them.

  • Modifying the shell prompt

    After cd’ing into ever deeper directory structures the shell prompt made my console look like a mess. A great article about prompt magic gave me all that I needed to clean this up.

  • Qt learning curve journal, part I

    The goal – to create a cross platform application infrastructure for Linux, Windows and Mac that will serve as the basis for future cross platform application.

    I first thought of using wxwidgets but noticed that there were problems getting it to compile on Mountain Lion OS/X. In addition, Qt seemed more equipped to handle to sort of functionality and support I require in the projects that will be developed. Although Nokia recently sold Qt to Digia, my assumption is that it will continue to be developed and supported by a wide community of developers.

    In addition, a secondary goal is to evaluate Necessitas, the Qt port for the Android platform and check work in process for iOS and Windows Phone.

    I’ll first focus on the process for Linux (tested on Ubuntu 12.04) and OS/X (tested on Mountain Lion).

    Installation

    Linux
    First thing’s first – download the Qt libraries for Linux/X11, extract, cd to the folder and ./configure. You will be asked if you want to use the open source or commercial license version (since the open source license is LGPL, I assume choosing this option creates a shared library). after some additional questions, the configure process will begin to create the make file (its a big project so give it time). Finally, if all goes well you should see:

    Qt is now configured for building. Just run 'make'.
    Once everything is built, you must run 'make install'.
    Qt will be installed into /usr/local/Trolltech/Qt-4.8.3
    
    To reconfigure, run 'make confclean' and 'configure'.

    Expect make to take a very long while (as in take a long lunch break). This is a huge project.

    OS/X
    From the location specified above, you can either download the two dmg files (library and debug) or download the same file as for Linux if you wish to go through the compilation process. In the latter case, there are some changes in the compilation method that are specified here. I opted for the easier method of simply downloading and installing the dmg files.

    Another (and perhaps better) option on OS/X is to install homebrew and simply issue an

    brew install qt

    Compiling and running an example

    Linux
    On Linux the tutorial sample is located at qt-everywhere-opensource-src-4.8.3/examples/tutorials/gettingStarted/gsQt/part1 (under the directory you extracted it to).

    To make the sample, issue:

    qmake -project
    qmake
    make

    OS/X
    On OS/X the tutorial sample is located at /Developer/Examples/Qt/tutorials/gettingStarted/gsQt/part1
    To make the sample, issue:

    qmake -spec macx-g++
    qmake
    make

    On my Mac, the make resulted in the following error:

    g++: error: x86_64: No such file or directory
    g++: error: unrecognized option '-arch'
    g++: error: unrecognized option '-Xarch_x86_64'
    make: *** [main.o] Error 1

    if you get compilation errors during make, your compilers could be different from the standard versions for your Xcode. If you have Xcode 4.3 or newer, you should install the Command Line Tools for Xcode from within Xcode’s Download preferences (via menu: Xcode->Preferences…).

    I learned the above from homebrew (which by the way is a great package manager for OS/X – bye bye fink and macports) after installing it and running homebrew doctor. Once I installed the command line tools for Xcode the make completed smoothly.

  • Recursively remove specific filename in Linux

    The trick is to use the find command with the -exec or -execdir parameter. I needed to remove all the files named serials_dev.db3 from multiple backup directories. The following did the job:

    find . -type f -name "serials_dev.db3" -exec rm -f {} ;

    Here are the relevant parts from the find man page:

           -exec command ;
                  Execute command; true if 0 status is returned.  All following
                  arguments to find are taken to be arguments  to  the  command
                  until  an  argument  consisting  of  `;' is encountered.  The
                  string `{}' is replaced by the current file name  being  pro‐
                  cessed  everywhere it occurs in the arguments to the command,
                  not just in arguments where it is alone, as in some  versions
                  of  find.   Both  of  these  constructions  might  need to be
                  escaped (with a `') or quoted to protect them from expansion
                  by  the  shell.  See the EXAMPLES section for examples of the
                  use of the -exec option.  The specified command is  run  once
                  for each matched file.  The command is executed in the start‐
                  ing directory.   There are unavoidable security problems sur‐
                  rounding use of the -exec action; you should use the -execdir
                  option instead.
    
           -exec command {} +
                  This variant of the -exec action runs the  specified  command
                  on  the  selected  files,  but  the  command line is built by
                  appending each selected file name at the end; the total  num‐
                  ber  of invocations of the command will be much less than the
                  number of matched files.  The command line is built  in  much
                  the  same  way that xargs builds its command lines.  Only one
                  instance of `{}' is allowed within the command.  The  command
                  is executed in the starting directory.
    
           -execdir command ;
    
           -execdir command {} +
                  Like  -exec, but the specified command is run from the subdi‐
                  rectory containing the matched file, which  is  not  normally
                  the  directory  in  which you started find.  This a much more
                  secure method for invoking commands, as it avoids race condi‐
                  tions  during  resolution  of the paths to the matched files.
                  As with the -exec action, the `+' form of -execdir will build
                  a command line to process more than one matched file, but any
                  given invocation of command will only list files  that  exist
                  in  the  same subdirectory.  If you use this option, you must
                  ensure that your $PATH environment variable does  not  refer‐
                  ence  `.';  otherwise,  an attacker can run any commands they
                  like by leaving an appropriately-named file in a directory in
                  which  you  will  run  -execdir.   The same applies to having
                  entries in $PATH which are empty or which  are  not  absolute
                  directory names.
  • A collection of older information

    This is the previous content of the nocurve.com site, where the idea was to store information that will assist in saving precious time when trying to develop something or fix something.

    Geany

    This is the home page

    One crazy issue I had on Windows was that for some reason at some point the Geany window disappeared. The task was active, clicking the icon would bring it to focus but would not show the Window. It was obviously hidden or thrown out of the desktop view. I assumed the window saved it’s state with some insane coordinates but couldn’t get it back to show in the desktop.

    Finally found the answer here – sure helps when you know some Windows basic techniques…

    “I have installed Geany 0.19.1 on Windows 7, I run the Geany.exe shortcut and it appears running on my windows taskbar, if I hit Alt+Tab I see the Geany icon. But… no window is shown. Where is the Geany window? How to fix it?”

    “Press Alt-Space, then M, then the arrow keys to move the window into view.” (you can also use the mouse instead of the arrow keys to speed up the process)

    DIV Charts

    Attachment “jsdivcharts.jpeg” not found
    Free (LGPL) DIV based JavaScript Charts. This provides to main advantages to other JavaScript charting libraries:

    • It uses DIVs instead of Canvas or VML, which means it will work virtually on any browser (including the Android native Web browser which as of this writing does not support these technologies).
    • It is really simple to use. The charting library does all the thinking for you 🙂
    • Currently supported: Stacked Bar Charts, Bar charts (Which is just a Stacked Bar Chart with one group) Compound charts (stacked bars and lines), tooltips, Pie Charts, automatic Y axis step calculation, default color support

    This charting library builds upon the amazing javascript wz_graphics library created by Walter Zorn. Unfortunately, I only recently learned that Walter Zorn passed away in May 2009. May this little contribution be a tribute to his work.

    To view a demo of the DIVCharts library and download it, just go here

    Change Google Chrome’s default language on Mac

    To change the Google Chrome application language to English on Mac OS/X, open a terminal window and at the command prompt type the following.

    defaults write com.google.Chrome AppleLanguages '(en-US)'

    The next time you’ll open Chrome it will be in English (actually, its recommended to close Chrome before doing this).

    Long Path to Short 8.3 MS-DOS path conversion

    Every once in a (long) while I require this. Being surprised by the lack of such a simple utility I quickly made one for public use. You can download the VS2008 C++ project and source code from here. If you just want the executable, you can get it here (just drag the file in the long path to the upper field and click the OK button to get the short path inthe lower field.

    Access MSSQL from PHP

    On Ubuntu

    First, install the LAMP (Linux,Apache,MySQL,PHP) package as follows:

    $sudo apt-get install lamp-server^

    Note that the ‘^’ at the end is not a typo !

    Next, install MSSQL support for PHP (taken from here)

    $sudo apt-get install php5-sybase
    $sudo /etc/init.d/apache2 restart

    On Windows

    First install one of the available WAMP (Windows,Apache,MySQL,PHP) packages (I use this)

    Next, download and install Microsoft’s PHP extension for MSSQL (from here)

    The above setup contains quite a few candidates to be the PHP extension. Make sure you copy the relevant extension dll (in my case it was php_pdo_sqlsrv_53_ts_vc6.dll ) from Microsoft’s setup to the php extensions folder (in my case it is located at c:wampbinphpphp5.3.0ext ) and use either php.ini or the wampserver UI to add it to the list of extension dll’s PHP loads at startup.

    Connecting to the MSSQL database

    After you’ve done the above, you can now connect to the MSSQL server. The following code will work on both Ubuntu and Windows:

    $serverName = "mymssqlserver.com"; 
    $database   = "mydbname";
    $uid        = "username";
    $pwd        = "password";
    
    try
    {
        if ( stripos(php_uname(), "linux") === false )
        {
            $g_conn = new PDO( "sqlsrv:server=$serverName;Database=$database", $uid, $pwd);
        }
        else
        {
            $g_conn = new PDO( "dblib:host=$serverName;dbname=$database", $uid, $pwd);
        }
        
        $g_conn->setAttribute( PDO::ATTR_ERRMODE, PDO::ERRMODE_EXCEPTION ); 
    }
    catch( PDOException $e )
    {
        die( "Error connecting to SQL Server" ); 
    }
    
    // You can now use $g_conn to execute pdo queries.

    Simultaneous VPN and Internet Access on Ubuntu

    This might be already solved in newer (>11.04) versions of Ubuntu.

    The following assumes you installed a VPN connection in Ubuntu, but when you connect to the VPN you can’t access the public Internet. It took me some time until I found an answer that worked here:

    “First, I determined what ip address ranges were being used on the VPN, in my case 192.168.32.* and 192.168.16.*. Then I connected to my vpn normally and sshed to a server on the network. I ran route on that machine and got the gateway address and metric being used. Then I added routes for the two ip address ranges to the routes field in the IPv4 settings tab and clicked on “Use this connection only for resources on its network” and “Ignore automatically obtained routes”. Then poof like magic it worked.”

  • Writing a GIMP plugin

    The first thing mentioned in the GIMP developer plugin tutorial is that gimptool-2.0 is required to to install a plugin, however it does not mention where this tool is available. A search provided this site which explained it is part of the gimp development library. On Ubuntu just issue:

    sudo apt-get install libgimp2.0-dev
  • ssh – automatic remote login

    Since I don’t do this often enough to remember – here’s the procedure summarized (for Linux and OS/X, on Windows use putty):

    me@here is username me at ip/hostname here
    user@there is username user at ip/hostname there

    me@here$ cd
    me@here$ ssh-keygen -t rsa

    press return a few times, don’t enter passphrase. This will create a public/private RSA key pair in your .ssh folder

    Create the .ssh directory on the remote device (if it doesn’t already exist), and then add the local public rsa key to it’s list of authorized keys:

    me@here$ ssh user@there mkdir -p .ssh
    user@there's password:
    me@here$ cat .ssh/id_rsa.pub | ssh user@there 'cat >> .ssh/authorized_keys'
    user@there's password:

    the next time you ssh user@there you will not be prompted for a password.

    Note that some systems might require the following:

    • Placing the public key in .ssh/authorized_keys2
    • Changing permissions of .ssh to 700
    • Changing permissions of .ssh/authorized_keys2 to 640


    git ssh keys on Windows

    If you install git on Windows, the ssh key will be in directory

    c:Program Files (x86)Git.ssh

    If you have linux tools for windows installed, the .ssh folder it will use will be in your user directory

  • Lua with nginx

    Openresty is an excellent piece of work that enables combining Lua scripting with the power of nginx, thereby giving you Lua as a server side scripting engine. Installing it is simple – just get the stable or latest version from the site, open it, ./configure, make and sudo make install.

    On a clean Ubuntu, you will need to add the openssl and pcre libraries before doing the above so simply run:

    sudo apt-get install libpcre3-dev
    sudo apt-get install libssl-dev

    and then follow the above steps.

    Extensive documentation and sample snippets for openresty are available on the nginx site on the page for the HttpLuaModule

    On a fresh Ubuntu, you might get all kinds of locale warnings or errors and get giberish when viewing foreign language files in the console – the solution:

    sudo apt-get install language-pack-en-base
    sudo dpkg-reconfigure locales